Shoulders are one of the most articulate parts of the human body, and such also one of the most difficult parts to rig and make it look correct. There are many different ways of setting up a shoulder, and the choice of which should normally depend on the flexibility and the shot/motion desired.
This is one method i have tested to get nice
deformation, as well as a large amount of flexibility and movement.
Here we will be using curves to deform the mesh, so there is no shape
animation needed. The idea behind using this method is to be sure that
we will not get any shapes overlapping with each other that shouldnt
be, causing bad deformation, as well as getting a nice organic look
without the need for in betweens.
To demonstrate i suggest you take a look at the example avi file showing the shoulder, as well as the rig deforming the shoulder.
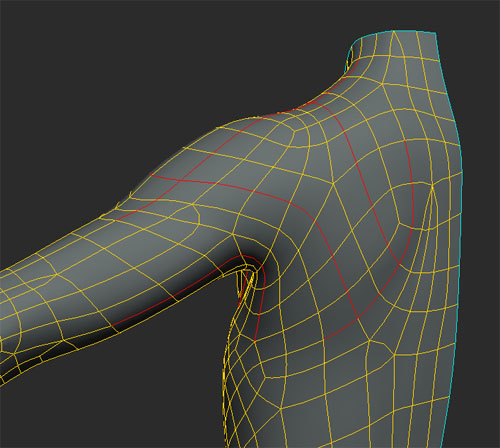
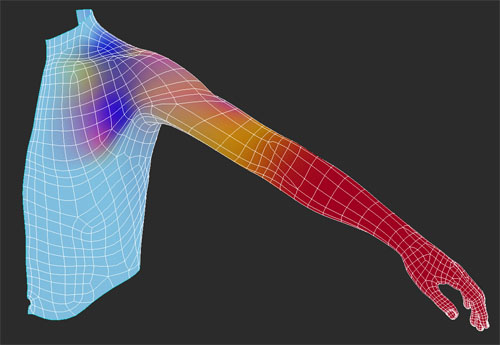
The first step in this setup is to look at the topology of the shoulder, arm and pecks that you want to deform, as to get the best results your curves should follow the flow of the topology on the mesh.
Before we start actually creating something its important that when
rigging with curves to understand that your rig can become very heavy
if it it not optimised for efficiency. So the placement of the curve
clusters is highly important to get the result you desire without
needed more clusters than is really necersary. Also, in this tutorial i
choose to create my own constrain curves to deform the mesh, you
however could choose to use the Control Splines from the Skeleton menu.
Start by creatin a curve to define where the scapula will push out.
This shouldnt really require anything more than a four point curve on a
human. then go into point editing mode, and select each individual
point on the curve and choose to make it a cluster with a center, this
allows us to deform the curve. The create a poly mesh cube (or any
object you desire) resize it down if it looks big compared to your
mesh, and path constrain it to the curve, enable tangency, and
duplicate it along the curve, increasing the path % for each one. Again
here it is important to look at how many duplications you need to make,
and how many are just too much, i chose to have five, so each cubes
path % as an increment of 20. These will be the deformers.
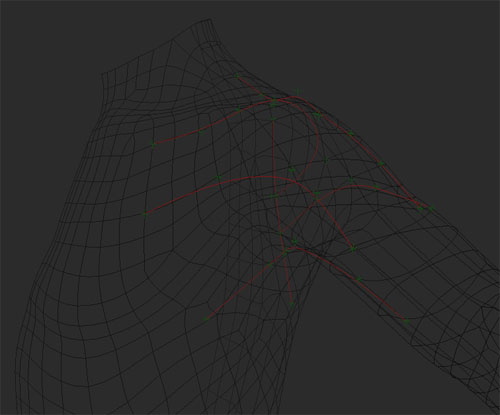
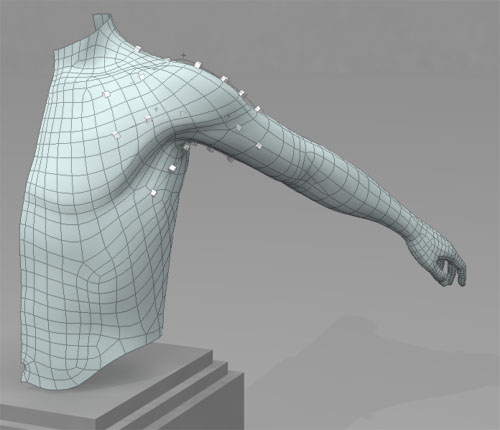
Now we need to repeat this step but for other curves, so, make another
curve that follows along the top of the shoulder , moving slightly down
the arm, then again under the arm, in front of the arm and over the
shoulder, as shown in the picture.
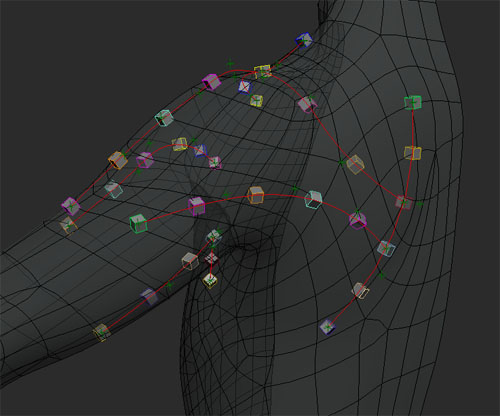
Once you have this, you will see a small net of curves with deformers
constrained which represent the area's of pull around the shoulder,
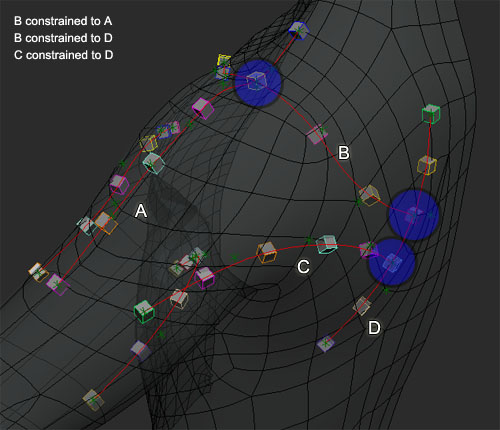
where curves intersect you should look and decide which of the two
intersecting curves have a pull priority, so which one should pull the
other. So for instance, on the top of the shoulder i have two
intersecting curves, so i use the curve with is parralell with the arm
to be the driving curve out of the two, so i take the cluster of the
curve which is perpendicular, and constrain that to the nearest
deformer on the paralell curve, this way, when the paralell curve is
deformed it will autmatically push the perpendicular curve. Repeat this
step with any other intersecting areas you have. If you are unsure then
have a look at the opposite image to see what i constrained to what.
Ok, still with me? Now, hopefully you will already have a base rig in
the character (just a simple default skeleton will be fine) as this
will be used as both deformers and parents of our clusters.
Select all your cluster with centers , and cut them from their
hierarchy. Then look at the placement of them and decide which would
move with the arm by default, and which would stay static or move with
the shoulder. Once you know which catagory each one falls into you can
begin to parent them. So any clusters that should move with the arm
should be children of the arm bone, and any that are static should be
children of the shoulder bone. This gives the base motion of the curves
without any intervention from us. Also, to be sure that the rotation of
the cubes with stay the same you should use the bones as upvectors for
the path constrained cubes. You may not realise yet but when you start
rotating the arm, the cubes will begin to skewer the mesh little by
little. By seting an upvector you are sure that the cubes will
constantly be facing one direction.
Once you do this, if you move the arm bone around you will see the
curves deform with the arm, though the movement is not yet correct, and
so this is the next step.
Now is the time to set an envelope, to make things easier its always
best to create a deformer group, then it can be done in one click, so
select your mesh and envelope that to the deformers, the deformers
include both the cubes and the base bones of the skeleton.
Once you have set the envelope if you rotate the arm, it will be much
easier to see the area's where the curves need a little assistance
getting the right shape, for instancy, if you rotate the arm down, it
will not hold a nice volume etc. To counter this and to gain the shape
of the mesh we want, select one of the curve cluster nulls and you will
see that if you move it around it will deform the mesh, as its pulling
the curve, so by knowing this we know that we can link the position of
nulls to the rotation of the bone. As always, look at the axis the
nulls need to move on, if it only needs to move up then link only the
Y, as there is no need to link them all. Also, you will find that in
some cases you may need to link the posY of one objet to the rotx of a
bone, and the posX of the same object to the rotZ of a bone, so dont
just immeadiatly link all the axis, think before you link =)
You may find it easier to keyframe a motion on the arm, so you can see
the shoulder deforming to many different arm rotations, this way you
can be sure that your shoulder will work for at least all of your test
rotations.
The rest is just down to enveloping. If you envelope well, and you have
linked the position of the nulls well then you should end up with a
nice articulate shoulder capable of a huge rotation range.
Enjoy
Mike.
 |
 |
 |
 |
 |